![]()
Before we jump into ARM Templates, let us first understand what we understand by Azure Resource Manager (ARM).
You might be using Azure for various reasons, and there might be a time when you get stuck in deploying the required resources.
Azure Resource Manager (ARM) is a management framework used in Microsoft Azure to deploy, manage, and organize Azure resources. ARM provides a way to create and manage resources consistently and predictably. In this blog, we will discuss what ARM is and how to use Azure Resource Manager Template (ARM Template), and how they are beneficial in automating the deployment.
I will cover the following topics in this blog :
- Deploy Using a Parameters File (Optional)
- ARM Deployment Modes
- ARM Template Best Practices
- ARM Template Resources
- ARM Templates FAQ
- Conclusion
What is Azure Resource Manager (ARM)?
Azure Resource Manager is a service that provides a way to organize resources in Azure. With ARM, you can define and deploy Azure resources as a single logical unit called a resource group. This resource group can contain various Azure resources such as virtual machines, storage accounts, and network interfaces.
The primary benefits of using ARM are:
- Consistency: ARM provides a consistent way to create, deploy, and manage Azure resources.
- Modularity: ARM enables you to define your infrastructure as a set of reusable templates, making it easier to manage and maintain.
- Automation: ARM enables you to automate the deployment and management of your infrastructure, saving time and reducing errors.
- Tagging: ARM enables you to tag your resources, making it easier to organize, track, and manage them.
What are ARM Templates?
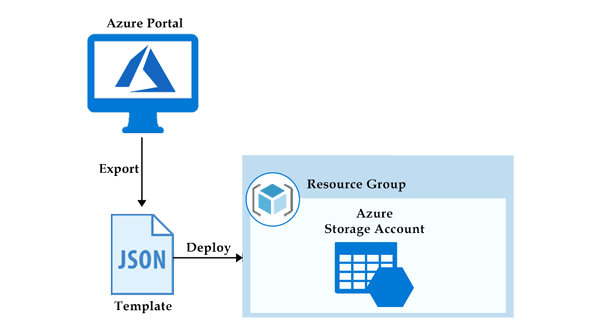
ARM (Azure Resource Manager) template is a block of code that defines the infrastructure and configuration for your project. These templates use a declarative syntax to let you define your deployment in the form of JSON (JavaScript Object Notation) files. All the resources and their properties are defined in this template. This helps in automating the deployment process in a constant flow.
Benefits of Using ARM Templates
ARM Templates provide multiple advantages over the deployment process.
- Using ARM Templates, we can declare network infrastructure, storage, and any other resources.
- Over the development lifecycle, ARM Templates allow the deployment of resources repeatedly in a consistent manner.
- User can deploy templates parallelly, and only one command is sufficient to deploy all your resource settings.
- Templates can be divided into different modules. In other words, templates can be broken into multiple templates so that a parent template can consist of small templates.
- The PowerShell or Bash Scripts can be added to the templates using deployment scripts.
- The working of ARM Templates can be tested using the ARM template toolkit.
- A user can see the preview of the template. All the resources that are being created or deleted in this template will be shown in the preview.
- A user can integrate templates with Continuous Integration (CI) and Continuous Deployment (CD) tools to automate the release.
Also, Read Our blog post on Azure Networking.
Understanding ARM Template
If you are familiar with programming and codes, it will be easier for you to understand the template code. If not, then I will explain you in short and simple terms.
Template Format
The ARM Templates file contains various key-value pairs in JSON format. For example, below, you can see a format of ARM Templates.
{
"$schema": "https://schema.management.azure.com/schemas/2015-01-01/deploymentTemplate.json#",
"contentVersion": "1.0.0",
"parameters":{},
"variables":{},
"functions":[],
"resources": [],
"outputs":{}
}
- Schema – This ‘schema’ defines the location of the JSON file and specifies the version of the template language that you want to use in this template. This schema depends on the purpose of your deployment. Some schema types are listed below.
- Resource Group Deployment – https://schema.management.azure.com/schemas/2019-04-01/deploymentTemplate.json#
- Subscription Group Deployment – https://schema.management.azure.com/schemas/2018-05-01/subscriptionDeploymentTemplate.json#
- Management Group Deployment – https://schema.management.azure.com/schemas/2019-08-01/managementGroupDeploymentTemplate.json#
- Tenant Group Deployment – https://schema.management.azure.com/schemas/2019-08-01/tenantDeploymentTemplate.json#
- Content Version – It specifies the version of the templates. This version can be any number that you want to give to your template.
Parameters
Parameters in templates define the configuration. These parameters are used in run time or during deployment. In a parameter, we need to define the name, type, values, and properties. We can also set some allowed values and default values to the parameters, so when a value is not passed during deployment, then the default or allowed values will be used. Below is an example of parameters that defines the type and the default value of username and password for the VM (Virtual Machine).
"parameters": {
 "adminUsername": {
  "type": "string",
  "defaultValue": "Admin",
  "metadata": {
   "description": "Username for the Virtual Machine."
    }
  },
  "adminPassword": {
   "type": "securestring",
   "defaultValue": "12345",
   "metadata": {
    "description": "Password for the Virtual Machine."
    }
  }
}
Variables
Variables define values used throughout the template. In simple words, you can define a short name for a specific value that can be used anywhere in the template. Variables also become an advantage when you want to update all the values and references in a template. Then you can update the variable and its value only.
"variables": {
 "nicName": "myVMNic",
 "addressPrefix": "10.0.0.0/16",
 "subnetName": "Subnet",
 "subnetPrefix": "10.0.0.0/24",
 "publicIPAddressName": "myPublicIP",
 "virtualNetworkName": "MyVNet"
}
Functions
In a template, the function contains the steps and procedures to be followed. It is just like a variable that defines the steps performed when called in templates. The below example of the function defines the unique name for the resources.
"functions": [
 {
  "namespace": "contoso",
  "members": {
   "uniqueName": {
    "parameters": [
      {
       "name": "namePrefix",
       "type": "string"
      }
    ],
    "output": {
     "type": "string",
     "value": "[concat(toLower(parameters('namePrefix')), uniqueString(resourceGroup().id))]"
         }
       }
     }}],
Resources
All the azure resources are defined here which makes the deployment. For creating a resource, we need to set up the type, name, location, version, and properties of the resource that needs to be deployed. We can also use the variables and parameters here that are defined in the ‘variables’ section. Below is an example of declaring the resources in templates.
"resources": [
 {
  "type": "Microsoft.Network/publicIPAddresses",
  "name": "[variables('publicIPAddressName')]",
  "location": "[parameters('location')]",
  "apiVersion": "2018-08-01",
  "properties": {
    "publicIPAllocationMethod": "Dynamic",
    "dnsSettings": {
    "domainNameLabel": "[parameters('dnsLabelPrefix')]"
    }
  }
}
],
Outputs
Output defines the result that you want to see when a template runs. In simple words, the final words that you want to see when a template is successfully deployed. In the below example, the hostname with a value fetched from the public IP address name.
"outputs": {
 "hostname": {
  "type": "string",
  "value": "[reference(variables('publicIPAddressName')).dnsSettings.fqdn]"
 }
}
Also Check: What is Azure Service Bus?
Azure Quickstart Template
Azure Quickstart Templates are ready to deploy sample templates. The Microsoft community creates these templates. You will find various Azure Quickstart templates on Microsoft’s official site like creating a VM (Virtual Machine), deploying the VM, etc. A beginner can use these quickstart templates to get familiar with the concept.
You can visit the portal from here.
After visiting the Azure QuickStart Template portal, you will see some template samples. Click on any sample and then choose ‘Browse on Github‘. Next, you can click on the ‘Visualize‘ button to see the preview of templates. Finally, you can choose the ‘Deploy‘ option to deploy the template to your Azure Portal.
Also, Read Our blog post on Azure Bastion.
Create and Deploy ARM Template
After learning the format of the ARM Templates, we are ready to learn the process of creating and deploying ARM templates. For writing a template, any JSON editor will work. Also, Visual Studio Code is a tool provided by Microsoft for writing codes in various formats, including JSON. You can get Visual Studio Code from the official Microsoft website or store. No tool is required by the users with access to Azure Portal as the platform already contains built-in editors. So, we will use Azure Portal in this blog and assume that you have Azure access. Now, visit and log in to your Azure Portal. Then, follow the steps with us to create and deploy ARM Templates.
Create Resource
Cross-check the highlighted URL in the image below. Now, the first step is to create resources in the Azure Portal.
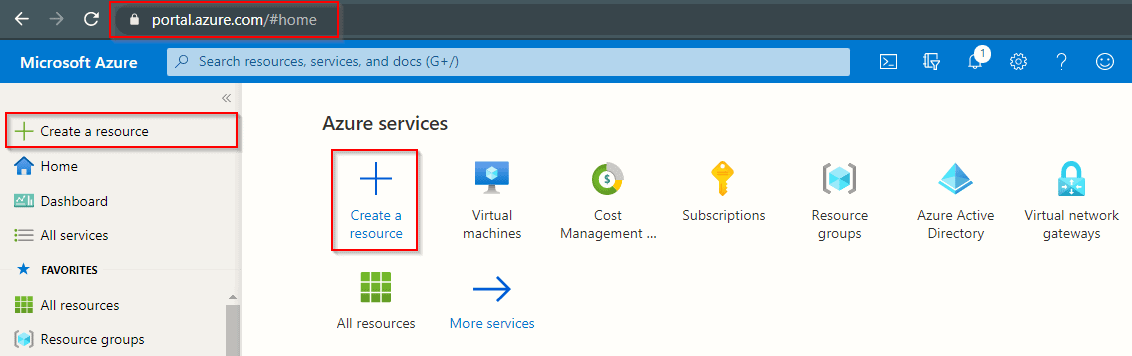
Check the above image. You will find the options to create a resource in Azure Portal. Click on the ‘Create a Resource‘ button.
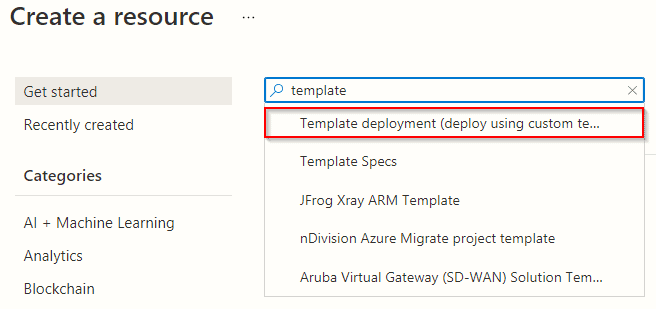
In the next window, you will see various options listed to create a resource. Some of these options are to create Windows, Ubuntu, Web App, SQL Database, etc. We will use a template for creating resources, so click on the search bar. Search the template and click on ‘Template Deployment (deploy using custom template)’ as highlighted in the above image.
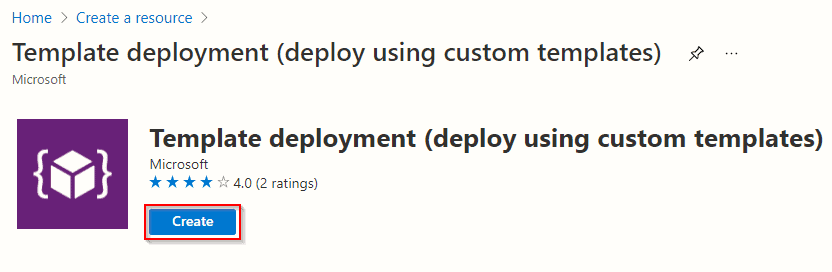
Template Deployment (deploy using custom template) window will open up. Now, click on the ‘Create‘ button as shown in the above image.
Build Your Template
Azure Portal will show the ‘Custom Deployment‘ window after clicking the ‘Create‘ button in the previous steps.

To create a template from scratch, click on the ‘Build your template in the editor‘ option as highlighted in the above image. Also, if you want to import your own and create a template, you can pick the same option.

Now, Azure Portal will open the ‘Template Editor‘ window. Here a simple format of the ARM Template will be available in the editor. Using the format, you can write and add your code in the editor. The highlighted menu at the top in the above image are options that you can pick to add a resource, use a quickstart template, load your template file, and download the created template.
Use QuickStart Template
Creating a template from scratch might be complicated for you, especially when you are a beginner. In Azure Portal, you can use quickstart templates instead of creating a template from the start.
For using quickstart templates, instead of opting for the ‘Build your template in the editor‘, we will follow the below steps.
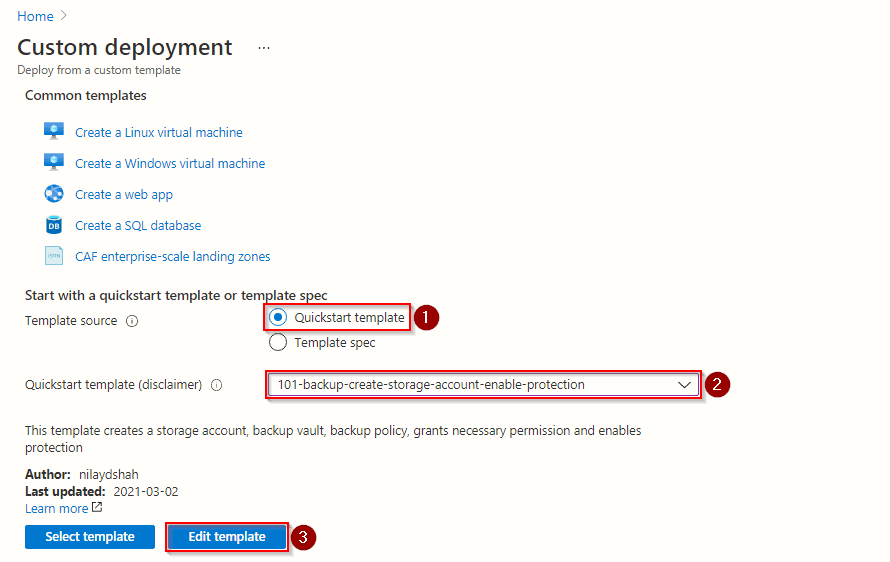
Step 1) Click on the ‘Quickstart template‘ radio button.
Step 2) Click on the drop-down button to see all the quickstart templates you can use. Next, search for the template that you want to use. Here, we choose a basic template to create a storage account and enable security on it.
Step 3) Click on the ‘Edit template‘ to modify and make changes in your quickstart template before deploying.
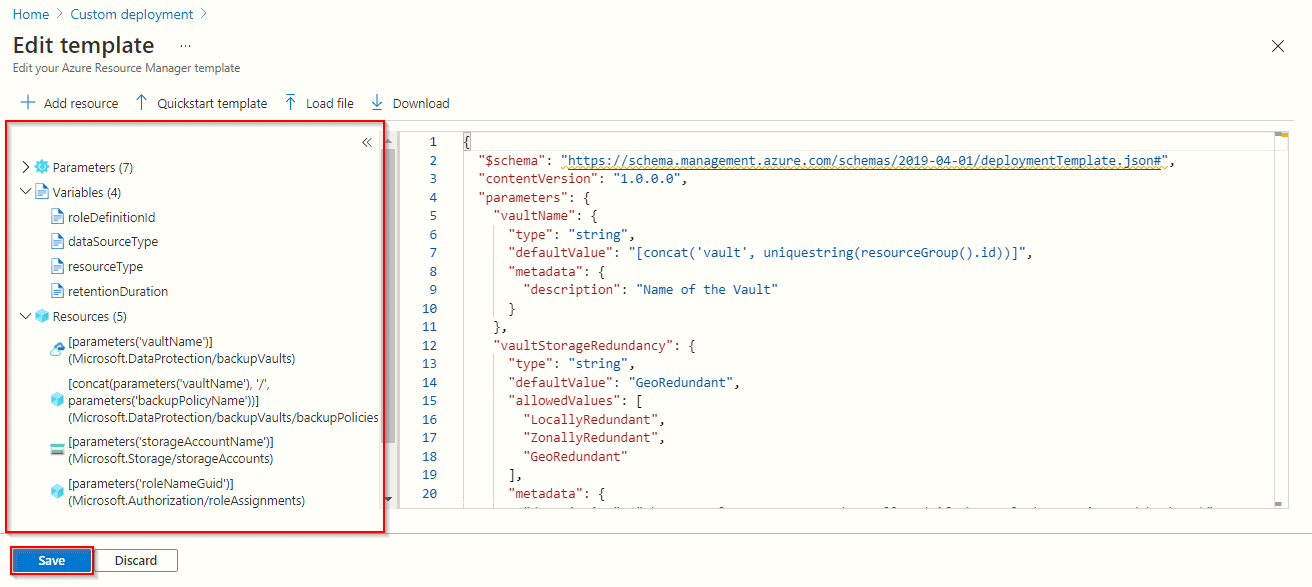
In the template editor window, you can make the required changes. On the left side of the editor window are the parameters, variables, and resources that this code will create. You can also use the above menu for downloading this template. When you are ready with the template code, click on the ‘Save‘ button as highlighted in the above image. After saving the template, another window will open to confirm all the resources that this template will create. After completing all the verification, you are ready to deploy your template and purchase the resources.
How to Deploy ARM Templates using PowerShell
While there are several ways to deploy Azure resources using ARM templates, this tutorial focuses on deploying a storage account using PowerShell. You will need the following items to follow along with this tutorial:
- PowerShell 5.1 or later is required. This tutorial makes use of version 7.1.3.
- PowerShell module for Azure (Az). This tutorial makes use of version 6.0.0.
- An Azure administrator account with resource creation permissions, such as Owner or Contributor.
i) Connect to Azure
To use the Az PowerShell module commands, you must first connect to Azure with an authenticated account. When you run the Connect-AzAccount command, PowerShell will launch an Internet browser to complete the authentication process.
Also, Read Our blog post on : [FIX]: The term ‘Connect-AzAccount’ is not recognized.
ii) Create a Resource Group
Create a resource group to house the ARM template resources. Give the resource group a name and an Azure region by using the New-AzResourceGroup command. Save the command output to a variable called $rg so you can refer to it later. The resource group’s name is “armdemo-rg,” and the location is “WestUs2.”
$rg = New-AzResourceGroup -Name armdemo-rg -Location WestUs2
iii) Create an ARM Template
To create the resource, you will need an ARM template with a storage account defined. Here is a simple ARM template that uses a single parameter called StorageAccountName to set the storage account name. This should be saved to a file called storageAccount.json.
{

    "$schema": "https://schema.management.azure.com/schemas/2019-04-01/deploymentTemplate.json#",

    "contentVersion": "1.0.0.0",

    "parameters": {

        "StorageAccountName": {

            "type": "string"

        }

    },

    "functions": [],

    "variables": {},

    "resources": [

        {

            "name": "[parameters('StorageAccountName')]",

            "type": "Microsoft.Storage/storageAccounts",

            "apiVersion": "2021-01-01",

            "tags": {},

            "location": "[resourceGroup().location]",

            "kind": "StorageV2",

            "sku": {

                "name": "Standard_LRS",

                "tier": "Standard"

            },

            "properties": {}

        }

    ],

    "outputs": {}

}
iv) Deploy the ARM Template
You can now deploy the storage account to your Azure environment after completing the ARM template. First, run New-AzResourceGroupDeployment with the resource group to deploy to ($rg.ResourceGroupName) and the storageAccount.json template file path specified. Add the -Verbose parameter to see the resource group deployment progress.
Because the ARM template makes use of a parameter, you can set its value just like any other PowerShell parameter. Enter a valid storage account name in the -StorageAccountName parameter of the command. The name of the storage account must be globally unique across Azure, with all lowercase numbers and letters. The name of the storage account, in this case, is template demo.
New-AzResourceGroupDeployment `

    -ResourceGroupName $rg.ResourceGroupName `

    -TemplateFile .\storageAccount.json `

    -StorageAccountName ‘templatedemo’ `

    -Verbose
v) Deploy Using a Parameters File (Optional)
While you can specify ARM template parameters in line with the PowerShell deployment command, if there are many parameters, this method can be time-consuming. Instead, you can specify the value in a parameter file.
With this content, create a new file named storageAccount.parameters.json in the same directory as the ARM template. Replace the name of the storage account with your own. We’re calling it templatedemo2.
{

    "$schema": "https://schema.management.azure.com/schemas/2019-04-01/deploymentTemplate.json#",

    "contentVersion": "1.0.0.0",

    "parameters": {

        "StorageAccountName": {

            "type": "string"

        }

    },

    "functions": [],

    "variables": {},

    "resources": [

        {

            "name": "[parameters('StorageAccountName')]",

            "type": "Microsoft.Storage/storageAccounts",

            "apiVersion": "2021-01-01",

            "tags": {},

            "location": "[resourceGroup().location]",

            "kind": "StorageV2",

            "sku": {

                "name": "Standard_LRS",

                "tier": "Standard"

            },

            "properties": {}

        }

    ],

    "outputs": {}

}
In Step 4, run the same command as before, but this time add the -TemplateParameterFile parameter with the value of the new parameter file.
New-AzResourceGroupDeployment `

    -ResourceGroupName $rg.ResourceGroupName `

    -TemplateFile .\storageAccount.json `

    -TemplateParameterFile .\storageAccount.parameters.json `

    -Verbose
ARM Deployment Modes
There are two types of ARM template deployments: incremental and complete. The Resource Manager service handles existing resources that are not defined in the template differently in these modes.
The Resource Manager service attempts to create all template resources in both modes. If the resource already exists and matches the template resource, the Azure resource is left unchanged. If you went back and ran the previous section’s commands again, Azure would not perform any operations.
When you change the value of one or more properties in a resource, Azure updates the resource with the new value. In the storage account example, for example, you could change the storage SKU from Standard LRS to Standard GRS and Azure would update the resource.
Deploying Using Complete Mode
Resource Manager deletes resources that exist in the resource group but are not specified in the template when in complete mode.
If your template contains a resource that isn’t deployed because the condition evaluates to false, the outcome is determined by the REST API version used to deploy the template. The resource is not deleted if you use a version before 2019-05-10. The resource is no longer available after 2019-05-10. The resource is deleted in the most recent versions of Azure PowerShell and Azure CLI.
Use complete mode with copy loops with caution. After resolving the copy loop, any resources that were not specified in the template are deleted.
Resources in the resource group specified in the deployment operation are eligible for deletion if you deploy to more than one resource group in a template. Secondary resource groups’ resources are not deleted.
Deploying Using Incremental Mode
In incremental mode, Resource Manager ignores resources in the resource group that isn’t specified in the template. The template’s resources are added to the resource group.
All properties are reapplied when redeploying an existing resource in incremental mode. The properties are not added incrementally. A common misconception is that properties that are not specified in the template are left unaltered. If certain properties are not specified, Resource Manager interprets the deployment as overwriting those values. Properties that aren’t in the template are reverted to their default values. Not just the ones you’re updating, but all non-default values for the resource. The template’s resource definition always includes the resource’s final state. It cannot be a part-time update to an existing resource.
Learn more about ARM Deployment Modes
ARM Template Best Practices
As we delve deeper into developing ARM templates, there are a few best practices to keep in mind.
The template should be no more than 4 MB in size. This limitation applies to the template after Resource Manager has expanded it with iterative resource deployments and values for variables and parameters. You are also limited to:
- 256 parameters
- 256 variables
- 800 resources (including copy count)
- 64 output values
- 24,576 characters in a template expression
Consider reducing the number of parameters and instead using variables or literal values for properties that do not need to be specified during deployment. Parameterize settings that vary depending on the environment, such as SKU, size, or capacity. To make deployments easier, always provide metadata for the parameter and use default values. Default values also serve as an example for those who use your template.
When a value appears more than once in the template, create variables. Consider using a variable to make the rest of the template easier to read if you create a resource property from a complicated expression.
When creating a new template, always hard-code the template and resource API versions and use the most recent API version. When the template works as expected, stick with the same API version to avoid breaking changes in later versions.
ARM Template Resources
Microsoft Learn has modules to help you learn more about ARM templates, including how to develop and deploy more complex environments. Examine their learning path For modules that go deeper into developing ARM templates, check JSON ARM templates to deploy and manage resources in Azure.
Microsoft’s Visual Studio Code (VS Code) includes extensions to help with ARM template development. See this quick-start tutorial on writing ARM templates for more information. Furthermore, many Microsoft and third-party extensions make writing ARM templates much faster.
ARM Templates FAQ
What are ARM templates, and why should I use them?
ARM templates are JSON files that contain information about what you want to deploy to Azure. Templates assist you in implementing an Azure infrastructure-as-code solution. Your organization can deploy the necessary infrastructure to different environments repeatedly and reliably.
What are some ARM template benefits?
ARM templates enable you to define and quickly create Azure resources. Because the resources are defined as code, you can rapidly deploy multiple developments, testing, and production environments.
What is Azure Resource Manager (ARM)?
Azure Resource Manager (ARM) is Microsoft's Azure deployment and management service. The ARM management layer is used to create, update, and delete Azure resources.
Is there a plan to support creating templates in YAML?
There are currently no plans to support YAML. We believe that the new template language will provide a more user-friendly solution than YAML or JSON.
Conclusion
ARM Templates is a JSON file that orders Azure Manager to create, update and deploy resources. From this blog, we learned about ARM Templates and why they are useful in deploying resources. Also, we are now familiar with the template and how we can create and deploy it in Azure.
In this blog, we only covered the basics of ARM Templates. If you want to get a deep insight into Azure Cloud and its infrastructure, check out our Microsoft Azure Solution Architect Certification course.
References
- Azure Networking: A Brief Introduction for Beginners
- Microsoft Azure Solution Architect [AZ-303/AZ-304]: Everything You Need To Know
- [AZ-303] Microsoft Azure Architect Technologies Certification Exam: Everything You Need To Know
- [AZ-900] Microsoft Azure Fundamentals Certification Exam: Everything You Must Know
- [AZ-104] Microsoft Azure Administrator Certification Exam: Everything You Need To Know
- Exam AZ-305: Azure Solutions Architect Expert Certification
- [AZ-104] Region, Availability Zone, Availability Sets, and Fault Domain Update Domain In Microsoft Azure
- Virtual Machine Scale Set (VMSS) In Microsoft Azure
Next Task For You
Begin your journey toward Mastering Azure Cloud and landing high-paying jobs. Just click on the register now button on the below image to register for a Free Class on Mastering Azure Cloud: How to Build In-Demand Skills and Land High-Paying Jobs. This class will help you understand better, so you can choose the right career path and get a higher paying job.


Leave a Reply